
Overview
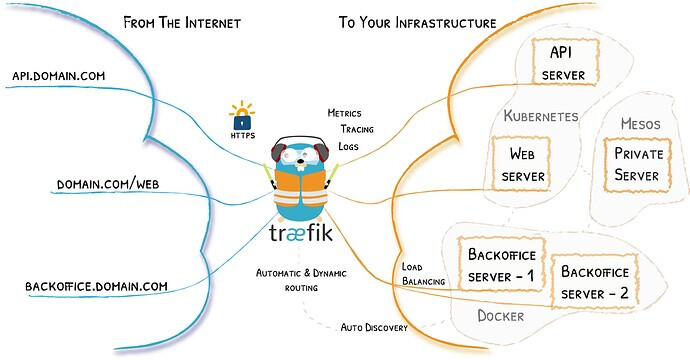
Traditional reverse-proxies require that you configure each route that will connect paths and subdomains to each microservice. In an environment where you add, remove, kill, upgrade, or scale your containers many times a day, the task of keeping the routes up to date becomes boring. This is when we can use Traefik to help us. Traefik is a modern HTTP reverse proxy and load balancer that makes deploying microservices easy. Traefik integrates with your existing infrastructure components and configures itself automatically and dynamically
Objective
The main idea of this QnA is that we can understand how it works, and how we can add Docker’s containers to Traefik. It’s really important to have knowledge of Docker Compose and how it works
Process: Registering Containers with Traefik
We have 2 options to registering containers with Traefik, both options are valid and aren’t much difference between both process. It’s really important to know that the docker provider enables Traefik to act as a proxy in front of Docker containers. We’ve configured the provider to watch for new containers on the proxy network so it’s really important to know the name of this network. We’ll manage both of these process with Docker Compose using a docker-compose.yml file.
1) Process
-
You need run a new service so you normally will create a
docker-compose.ymlfile in your editor code.
Examples: (In this case we use the Docker Compose from Jenkins as an example)version: '3.4' services: jenkins: restart: on-failure:10 image: jenkins/jenkins:latest container_name: AdvisionDev-Jenkins user: root ports: - 8080:8080 volumes: - ~/apps/jenkins:/var/jenkins_home -
Now we need to add some labels to you
docker-compose.ymlfile that will help us to registering this container with Traefik after that run this container in DockerMetal
Examples:- Without labels:
version: '3.4' services: jenkins: restart: on-failure:10 image: jenkins/jenkins:latest container_name: AdvisionDev-Jenkins user: root ports: - 8080:8080 volumes: - ~/apps/jenkins:/var/jenkins_home- With new labels:
version: '3.4' services: jenkins: restart: on-failure:10 image: jenkins/jenkins:latest container_name: AdvisionDev-Jenkins user: root ports: - 8080:8080 volumes: - ~/apps/jenkins:/var/jenkins_home labels: - "traefik.enable=true" - "traefik.frontend.rule=Host:jenkins.advisiondevelopment.com" networks: proxy: external: trueIf you look both codes we only add the following labels:
-
traefik.enable=true: to specify that Traefik should expose this container. -
traefik.frontend.rule=Host:jenkins.advisiondevelopment.com: tells Traefik to examine the host requested and if it matches the pattern ofservice.domainit should route the traffic to thejenkinscontainer. -
networks:
proxy:
external: true: For Traefik to recognize our applications, they must be part of the same network, we pull it in by specifying the network name ofproxyand settingexternaltotrue.
Important: networks: proxy: external: true parameter needs to be added at the end of the docker-compose.yml and inside service for the container network, if this paremeter is only added outside servides at the end of the file, service/container will not enter to the proxy network of Traefik.
-
Now we can use the following labels to identify the new container in Traefik’s dashboard.
-
traefik.frontend.passHostHeader=true
 [Forward client Host header to the backend]
 -
traefik.backend.healthcheck.hostname=<service name>
[Defines the health check hostname.] -
traefik.backend=<service name>
[Specifies the name of the backend service in Traefik] -
traefik.frontend.rule=Host:service.domain
[Tells Traefik to examine the host requested and if it matches the pattern of service.domainit should route the traffic to the service container.]
-
-
If you complete the steps and add the labels correctly you’ll see that there is now a
backendorfrontendthat depends of the new service we launch.
2) Process
With this second process apply in scenarios when we have running the container in DockerMetal and we need to registering this container in Traefik, so I will explain where find the docker-compose.yml file and how to edit with the editors nano or vim.
-
We need to access to DockerMetal server and move to
/opt/Docker-Compose/and here we can see all dockers compose inDockerMetalif we running the commandls -a. -
If the container we want to register to Traefik is in this location, you will move to the directory with the name of the container do you want to register and there you can see the
docker-compose.ymlfile, open it with your preferer editor (nano or vim) and add the labels and the networkproxyto the file.
Examples:
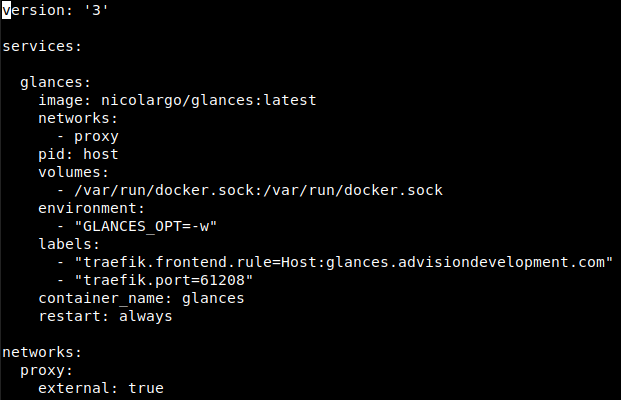
Now I will use as an example the Glance’s container.
-
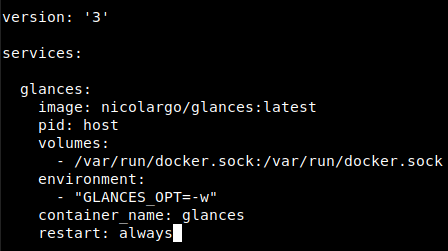
Without labels:
-
With Traefik labels:
-
In this case we added the network
proxyand settingexternaltotruefor Traefik to recognize our container -
Additional we add the labels:
-
traefik.frontend.rule=Host:glances.advisiondevelopment.comwith this label we tell Traefik to examine the host requested and if it matches the pattern ofglances.advisiondevelopment.comit should route the traffic to theglancecontainer. -
traefik.port=61208with this label we specify the exposed port that Traefik should use to route traffic to this container.
-
-
-
If you complete the steps and add the labels correctly you’ll see that there is now a
backendorfrontendthat depends of the new service we launch.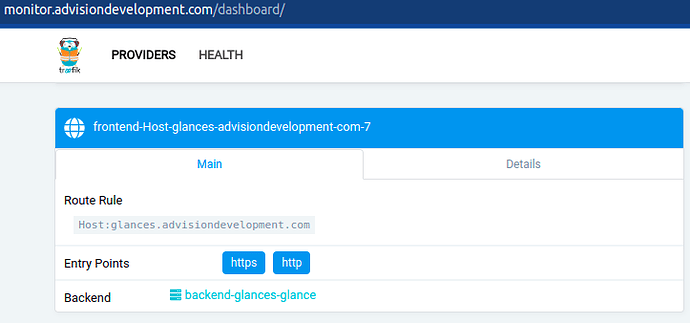

Conclusion
With this QnA you can configure Traefik to proxy request to other applications in containers. Traefik’s declarative configuration at the application container level makes it easy to configure more services, and there’s no need to restart the traefik container when you add new containers to proxy traffic to since Traefik notices the changes immediately through the Docker socket file it’s monitoring.
Traefik has more labels that we can use, If you wants to know about another labels you can find more information here Traefik Labels